Integrating DolphinDB with DolphinScheduler
DolphinDB is a real-time platform for analytics and stream processing, powered by a high-performance time series database. It offers capabilities related to efficient writes, fast queries, complex analysis, distributed parallel computing, and low-latency stream computing.
In DolphinDB data processing tasks, there are often multiple interdependent stages such as data import, transformation, query computation, and updates. To ensure these stages are executed efficiently and in the correct order, DolphinScheduler can be used for task scheduling based on specific requirements.
This tutorial explores data ETL in a production environment, integrating DolphinDB's high-availability cluster with DolphinScheduler to schedule DolphinDB ETL jobs.
1. Apache DolphinScheduler
Apache DolphinScheduler is a distributed, scalable open-source system for visual DAG (Directed Acyclic Graph) workflow task scheduling. Tailored for enterprise use, it provides a solution for visualizing task operations, workflows, and full-lifecycle data processing. It addresses the complexity of ETL dependencies in data development and the challenge of monitoring task status. DolphinScheduler assembles tasks in a DAG flow, enabling real-time monitoring of task execution status. It supports operations such as retry, recovery at specific nodes in case of failure, pause, resume, and task termination.
1.1. Features
- Execute scheduled tasks: In a production environment, DolphinScheduler makes it simple and efficient to manage periodic tasks like daily or hourly data ETL operations into DolphinDB.
- Execute historical tasks: For recalculating and reloading historical data due to business changes, you can define the workflow in DolphinScheduler and specify parameters like start and end time to process data for any period.
- Execute parallel tasks: DolphinScheduler supports parallel execution of multiple ETL tasks, improving efficiency when loading data into different tables or partitions in DolphinDB simultaneously.
- Efficient orchestration: In complex workflows, DolphinScheduler enables conditional task execution, where downstream tasks depend on upstream task statuses, simplifying orchestration and task dependency management.
1.2. Deployment
Note: Starting from version 3.3.1, DolphinScheduler natively supports DolphinDB. Please download v3.3.1 or later to use the related features.
DolphinScheduler can be deployed in a standalone, single-machine cluster, multi-machine cluster, and K8S (Kubernetes) environment. For detailed instructions, please refer to DolphinScheduler | DolphinsScheduler Documentation.
Note that connecting to DolphinDB via the DolphinDB datasource requires the DolphinDB JDBC driver and Java API package.
For example, in standalone deployment, download the required JAR files and
place them in the <dolphinscheduler>/standalone-server/libs
directory so that the runtime environment can load these dependencies
correctly.
- JDBC:Maven Repository: com.dolphindb » jdbc
- JAVA API:Maven Repository: com.dolphindb » dolphindb-javaapi
Once deployed and started successfully, enter
serverIP:12345/dolphinscheduler/ui/login in the browser to
log in:
- Default username: admin
- Default password: dolphinscheduler123
After logging in, you can see the following page:

1.3. Integrate DolphinDB with DolphinScheduler
Integrating DolphinDB with DolphinScheduler allows task code to be written in DolphinDB while the logical scheduling and orchestration of tasks can be handled in DolphinScheduler. This separation of task code and task dependencies enables more efficient operation and maintenance by focusing on the strengths of each component.
1.3.1. Create DolphinDB Datasource
- After installing and deploying DolphinScheduler, enter its Web
interface, click the Datasource and Create DateSource, and
select DOLPHINDB.

- Specify related parameters to create DolphinDB datasource.

1.3.2. Schedule DolphinDB Tasks
After creating DolphinDB datasource, you can create a tenant, project, and workflow. For details, refer to DolphinScheduler | Workflow Definition.
After defining the workflow, click on it to enter the operation interface. Then, drag and drop the SQL node on the left to define DolphinDB tasks.
The SQL node is classified as query and non-query types, each suited for different scenarios:
- Non Query type is mainly used for functions that do not return a result set; returning a result set will cause an error.
- Query type is mainly used for functions that return a result set.

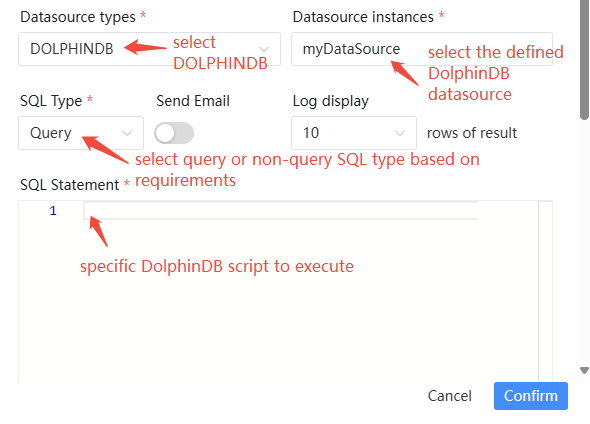
There are mainly three methods to schedule DolphinDB tasks:
- Enter the DolphinDB script code directly in the above SQL Statement panel
runfunctionIf the DolphinDB script is located at
/data/script.doson the server, you can input the following in the SQL statement:run("/data/script.dos");- Function view
- Define a function in
DolphinDB.
// Define a function in DolphinDB for creating tables def createTable(dbName, tbName){ login("admin", "123456") if(!existsDatabase(dbName)){ db1 = database(, VALUE, 2020.01.01..2021.01.01) db2 = database(, HASH, [SYMBOL, 10]) db = database(dbName, COMPO, [db1, db2], , "TSDB") }else{ db = database(dbName) } if(!existsTable(dbName,tbName)){ name =`SecurityID`ChannelNo`ApplSeqNum`MDStreamID`SecurityIDSource`Price `OrderQty`Side`TradeTIme`OrderType`OrderIndex`LocalTime`SeqNo `Market`DataStatus`BizIndex type = [SYMBOL, INT, LONG, INT, INT, DOUBLE, INT, SYMBOL, TIMESTAMP, SYMBOL, INT, TIME, LONG, SYMBOL,INT,LONG] schemaTable = table(1:0, name, type) db.createPartitionedTable(table=schemaTable, tableName=tbName, partitionColumns=`TradeTime`SecurityID, compressMethods={TradeTime:"delta"}, sortColumns=`Market`SecurityID`TradeTime, keepDuplicates=ALL) } else{ writeRunLog("Database:" + dbName + " table:" + tbName + " already exsists...") } } - Add the function as a function view to make it globally
accessible.
addFunctionView(createTable) - Call the function view in
DolphinScheduler.
// Enter the following in the SQL statement panel:
createTable("dfs://testDb", "testTb");
- Define a function in
DolphinDB.
The characteristics of the three methods are as follows:
- Direct DolphinDB script input: Parameters cannot be passed, and the script is stored temporarily in DolphinScheduler. Not recommended.
runfunction: Parameters still cannot be passed, limited flexibility.- Function view: Parameters can be passed from DolphinScheduler to
DolphinDB, improving flexibility. For the example above, you can input
the following in the SQL
Statement:
createTable(${dbName}, ${tbName});
There are two ways to pass parameters: local parameters and global parameters. The difference between them is that global parameters can be modified directly when creating a workflow instance, whereas local parameters need to be modified within the specific task node of the workflow:
- Local parameters are defined when creating the task
node.
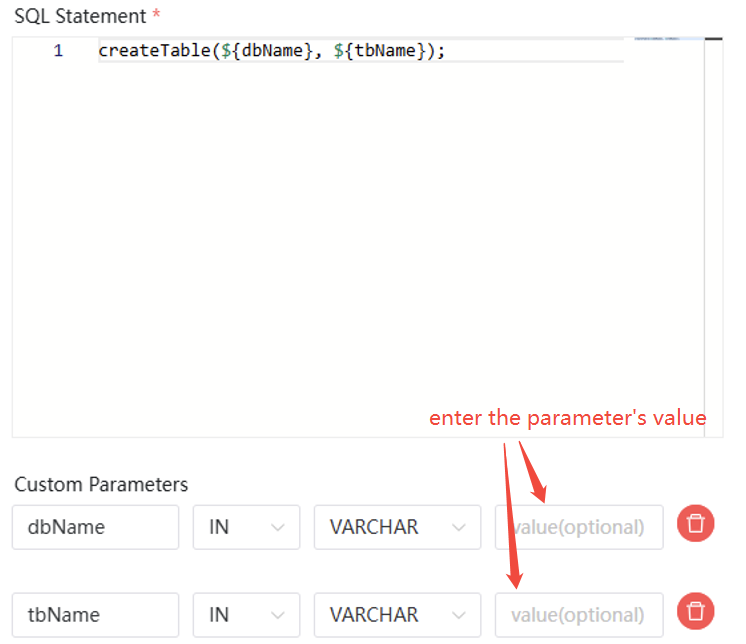
- Global parameters are defined when saving the workflow.

2. Schedule DolphinDB Data ETL Tasks
2.1. Schema of Task Workflow
- File schema
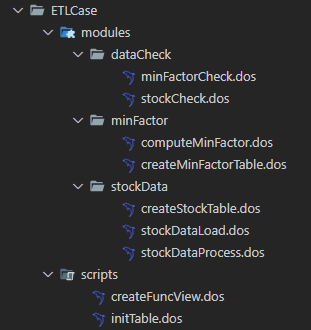
2.1.1. Files of DolphinDB Functional Modules
- stockData: Data import module
createStockTable.dos: Defines the function for creating corresponding stock database tables.stockDataProcess.dos: Defines the function for data cleaning, processing, and transforming.stockDataLoad.dos: Defines the function for importing data into the corresponding DolphinDB database and table.
- minFactor: Minute-level factor module
createMinFactorTable.dos: Defines the function for creating the minute-level factors table.computeMinFactor.dos: Defines the function for computing minute-level factors.
- dataCheck: Data check module
stockCheck.dos: Defines the function for checking imported stock data, including tick order data, snapshot data, and tick trade data.minFactorCheck.dos: Defines the function for checking minute-level factors.
2.1.2. DolphinDB Scripts
initTable.dos: Creates the corresponding stock tables and minute-level factor tables.createFuncView.dos: Defines the function views needed in DolphinScheduler.
2.2. Data Example
This tutorial uses order data, snapshot data and trade data of a specific stock from SSE on February 1, 2023 as an example. Below is the schema of the tick order data table in DolphinDB. The schema for snapshot and trade data can be found in the appendix.
| Field | Description | Data Type (DolphinDB) |
|---|---|---|
| ChannelNo | channel number | INT |
| ApplSeqNum | applied sequence number | LONG |
| MDStreamID | market type | INT |
| SecurityID | security ID | SYMBOL |
| SecurityIDSource | security ID source | INT |
| Price | order price | DOUBLE |
| OrderQty | order quantity | INT |
| Side | trading side | SYMBOL |
| TradeTime | trade time | TIMESTAMP |
| OrderType | order type | SYMBOL |
| OrderIndex | order index | INT |
| LocalTime | local time | TIME |
| SeqNo | sequence number | LONG |
| Market | market type | SYMBOL |
| DataStatus | data status | INT |
| BizIndex | business index | LONG |
2.3. Data Import, Factor Calculation and Task Check
Notes: The following sections define functions within modules for better management. For details on creating, loading, and calling DolphinDB modules, please refer to: Modules.
2.3.1. Data Cleaning, Processing and Importing
Since the configuration schema of the source data may not always align with our business requirements, you can add, remove, or process certain fields before importing the data into the database. Using tick order data as an example, this section explains the process of cleaning, processing, and importing the source data. The processing logic for snapshot and trade data is similar to that for order data, and more details can be found in the appendix.
- Create databases and tables
The tick order, snapshot, and tick trade data are all stored in the same database. This tutorial uses composite partitioning: data is first partitioned by day, and then by stock code into 25 hash partitions. For more details on data partitioning, please refer to: Data Partitioning.
module createStockTable // Create the database and table for tick order data def createEntrust(dbName, tbName,userName = "admin",password = "123456") { login(userName, password) if(!existsDatabase(dbName)) { db1 = database(, VALUE, 2020.01.01..2021.01.01) db2 = database(, HASH, [SYMBOL, 25]) // Partitioned by day and stock code db = database(dbName, COMPO, [db1, db2], , "TSDB") } else { db = database(dbName) } name=`ChannelNo`ApplSeqNum`MDStreamID`SecurityID`SecurityIDSource`Price`OrderQty`Side`TradeTIme`OrderType`OrderIndex`LocalTime`SeqNo`Market`DataStatus`BizIndex type = [INT, LONG, INT, SYMBOL, INT, DOUBLE, INT, SYMBOL, TIMESTAMP, SYMBOL, INT, TIME, LONG, SYMBOL,INT,LONG] schemaTable = table(1:0, name, type) // Create a partitioned table db.createPartitionedTable(table=schemaTable, tableName=tbName, partitionColumns=`TradeTime`SecurityID, compressMethods={TradeTime:"delta"}, sortColumns=`Market`SecurityID`TradeTime, keepDuplicates=ALL) } - CSV data cleaning and
processing
module stockData::stockDataProcess // Define the field names and types in the CSV file of tick order data def schemaEntrust() { name = `DataStatus`OrderIndex`ChannelNo`SecurityID`TradeTime`OrderType`ApplSeqNum`Price`OrderQty`Side`BizIndex`LocalTime`SeqNo typeString = `INT`LONG`INT`SYMBOL`TIME`SYMBOL`INT`DOUBLE`INT`SYMBOL`INT`TIME`INT return table(name, typeString) } // Define a function for data processing, including adding fields and data duplication def processEntrust(loadDate, mutable t) { // Replace field names t.replaceColumn!(`TradeTime, concatDateTime(day, t.TradeTime)) n1 = t.size() // Data duplication t = select * from t where isDuplicated([DataStatus, OrderIndex, ChannelNo, SecurityID, TradeTime, OrderType, ApplSeqNum, Price, OrderQty, Side, BizIndex],FIRST)=false n2 = t.size() // Add fields update t set Market = `sh update t set MDStreamID = int(NULL) update t set SecurityIDSource = int(NULL) reorderColumns!(t, `ChannelNo`ApplSeqNum`MDStreamID`SecurityID`SecurityIDSource`Price`OrderQty`Side`TradeTime`OrderType`OrderIndex`LocalTime`SeqNo`Market`DataStatus`BizIndex) return t,n1,n2 } - Import the processed data into
tables
module stockData::stockDataLoad
use stockData::stockDataProcess

def loadEntrust(userName, userPassword, startDate, endDate, dbName, tbName, filePath, loadType,mutable infoTb)
{
	for(loadDate in startDate..endDate)
	{
		// Delete exsisting data
		dateString = temporalFormat(loadDate,"yyyyMMdd")
		dataCount = exec count(*) from loadTable(dbName, tbName) where date(tradeTime)=loadDate
		// Delete any existing data to be processed in the table
		if(dataCount != 0){
			msg = "Start to delete the entrust data, the delete date is: " + dateString
			print(msg)
			infoTb.tableInsert(msg)

			dropPartition(database(dbName), loadDate, tbName)
			msg = "Successfully deleted the entrust data, the delete date is: " + dateString
			print(msg)
			infoTb.tableInsert(msg)
		}
		// Import data
		// Check whether the CSV file exists
		fileName = filePath + "/" + dateString + "/" + "entrust.csv"
		if(!exists(fileName))
		{
			throw fileName + "does not exist! Please check the data source!"
		}
		// Batch process market data due to its large quantity
		schemaTB = schemaEntrust()
		tmpData1 = loadText(filename=fileName, schema=schemaTB)
		tmpData1,n1,n2 = processEntrust(loadDate,tmpData1)
		pt = loadTable(dbName,tbName)
		msg = "the data size in csv file is :" + n2 + ", the duplicated count is " + (n1 - n2)
		print(msg)
		infoTb.tableInsert(msg)
		for(i in 0..23)
		{
			startTime = 08:00:00.000 + 1200 * 1000 * i
			tmpData2 = select * from tmpData1 where time(TradeTime)>=startTime and time(TradeTime)<(startTime+ 1200 * 1000)
			if(size(tmpData2) < 1)
			{
				continue
			}
			// Import data into database
			pt.append!(tmpData2)
		}
		msg = "successfully loaded!"
		print(msg)
		infoTb.tableInsert(msg)
	}
}
2.3.2. Minute-Level Factor Calculation
After importing data, you can process it to generate minute-level factors based on business and strategy needs, transforming the data into valuable insights that drive business growth. Below is the task flow for calculating factors based on 1-minute OHLC (minFactor) using trade data:
- Create a table to store OHLC
data
module minFactor::createMinFactorTable def createMinuteFactor(dbName, tbName) { if(existsDatabase(dbName)){ dropDatabase(dbName) } // Partitioned by day db = database(dbName, VALUE, 2021.01.01..2021.01.03,engine = `TSDB) colName = `TradeDate`TradeTime`SecurityID`Open`High`Low`Close`Volume`Amount`Vwap colType =[DATE, MINUTE, SYMBOL, DOUBLE, DOUBLE, DOUBLE, DOUBLE, LONG, DOUBLE, DOUBLE] tbSchema = table(1:0, colName, colType) db.createPartitionedTable(table=tbSchema,tableName=tbName,partitionColumns=`TradeDate,sortColumns=`SecurityID`TradeTime,keepDuplicates=ALL) } - Calculate minFactor and append to
database
module minFactor::computeMinFactor

def calFactorOneMinute(dbName, startDate, endDate, mutable factorTb,mutable infoTb)
{
	pt = loadTable(dbName, "trade")
	dayList = startDate..endDate
	if(dayList.size()>12) dayList = dayList.cut(12)
	for(days in dayList){
		// Calculate minFactor
		res = select first(TradePrice) as open, max(TradePrice) as high, min(TradePrice) as low, last(TradePrice) as close, sum(tradeQty) as volume,sum(TradePrice*TradeQty) as amount,sum(TradePrice*TradeQty)\sum(TradeQty) as vwap from pt where date(tradeTime) in days group by date(tradeTime) as TradeDate,minute(tradeTime) as TradeTime, SecurityID
		msg = "Start to append minute factor result , the days is: [" + concat(days, ",")+"]"
		print(msg)
		infoTb.tableInsert(msg)
		// Append minFactor into database
		factorTb.append!(res)
		msg = "Successfully append the minute factor result to databse, the days is: [" + concat(days, ",")+"]"
		print(msg)
		infoTb.tableInsert(msg)
	}
}
2.3.3. Data and minFactor Check
Since the minFactor calculation depends on the correctness of the upstream imported data, and the business relies on the accuracy of the minFactor, checking both is essential. Below are part of the checking steps. For details, please refer to the appendix:
- Check stock
data
module dataCheck::stockCheck def checkStockCounts(idate,dbName) { // Check whether the stock counts for tick order, snapshot and tick data are consistent getCodes = def (dbName,tbName,idate) { tb = loadTable(dbName,tbName) return exec distinct(SecurityID) from tb where date(tradetime)=idate and ((Market=`sh and SecurityID like "6%")or(Market=`sz and (SecurityID like "0%" or SecurityID like "3%" ) )) } entrustCodes = getCodes(dbName,"entrust",idate) tradeCodes = getCodes(dbName,"trade",idate) snapshotCodes = exec distinct(SecurityID) from loadTable(dbName,"snapshot") where date(tradetime)=idate and ((Market=`sh and SecurityID like "6%")or(Market=`sz and (SecurityID like "0%" or SecurityID like "3%" ))) and HighPrice != 0 if(entrustCodes.size() != snapshotCodes.size() or entrustCodes.size() != tradeCodes.size() or snapshotCodes.size() != tradeCodes.size()) { throw "Tick order stock quantity: " + size(entrustCodes) + " snapshot stock quantity: " + size(snapshotCodes) + " tick trade stock quantity: " + size(tradeCodes) + ", they are inconsistent!" } } - Check
minFactor
module dataCheck::minFactorCheck

def checkHighLowPrice(idate,dbName,tbName)
{
	// Check highPrice and lowPrice
	tb= loadTable(dbName,tbName)
	temp=select * from tb where tradedate=idate and High < Low
	if(size(temp)>0)
	{
		throw "Calculation error! highPrice must be larger than lowPrice!"
	}
}

def checkVolumeAmount(idate,dbName,tbName)
{
	// Check tradeVolume and tradeAmount
	tb = loadTable(dbName,tbName)
	temp = select * from loadTable(dbName,tbName) where tradedate=idate and ((Volume == 0 and Amount != 0) or (Volume != 0 and Amount == 0))
	if(size(temp)>0)
	{
		throw "Calculation error! tradeVolume and tradeAmount cannot be 0 at the same time!"
	}
}
2.4. Implementation of Scheduling DolphinDB Tasks
After defining ETL module, you can start to schedule DolphinDB ETL tasks by the following steps:
- Create databases and tables
Create databases and tables during the first execution:
use stockData::createStockTable use minFactor::createMinFactorTable // Create databases and tables (names can be modified as needed) createEntrust("dfs://stockData", "entrust") createSnapshot("dfs://stockData", "snapshot") createTrade("dfs://stockData", "trade") createMinuteFactor("dfs://factorData", "stockMinFactor") - Define function views and execute
Since the overall processing logic of daily scheduled ETL tasks and historical batch ETL tasks is the same, the different types of tasks are distinguished by passing parameters when defining function views. Taking the definition of the function view for importing tick order data as an example, the details are as follows (please refer to the appendix for the complete function view definitions):
use stockData::stockDataLoad
// Define functions
def loadEntrustFV(userName="admin" , userPassword="123456", startDate = 2023.02.01, endDate = 2023.02.01, dbName = "dfs://stockData", tbName = "entrust", filePath = "/hdd/hdd8/ymchen", loadType = "daily")
{
	infoTb = table(1:0,["info"] ,[STRING])
	if(loadType == "daily")
	{
		sDate = today()
		eDate = today()
		loadEntrust(userName, userPassword, sDate, eDate, dbName, tbName, filePath, loadType,infoTb)
	}
	else if(loadType == "batch")
	{
		loadEntrust(userName, userPassword, date(startDate), date(endDate), dbName, tbName, filePath, loadType,infoTb)
	}
	return infoTb
}
Note: When defining function views, the defaulted parameters should be modified as needed (e.g., filePath).
- Create DolphinDB task nodes
After defining function views, each of them is corresponding to a task node in the DolphinScheduler. Take the task of importing tick order data as an example, there are two scenarios:
- For daily scheduled tasks, since the parameters are defaulted
when defining function views, you can directly input the following
SQL Statement in DolphinScheduler task
nodes:
loadEntrustFV(); - For historical batch tasks, input three parameters:
startDate, endDate, and loadType, and then
input the following SQL statement in DolphinScheduler task
nodes:
loadEntrustFV(startDate=${startDate},endDate=${endDate},loadType="batch");Note: The local or global parameters startDate and endDate should be defined in DolphinScheduler. For details, please refer to section 1.3.2 Schedule DolphinDB Tasks.
- For daily scheduled tasks, since the parameters are defaulted
when defining function views, you can directly input the following
SQL Statement in DolphinScheduler task
nodes:
- Create DolphinDB task workflows
Two workflows should be created in DolphinScheduler: scheduled task and historical batch task workflow, where task nodes with logics should be created according to each workflow's ETL process. Take historical batch tasks as the example, create the following workflow:
After creating the workflow, you can click the Start button for execution, or click the Timing button for scheduling.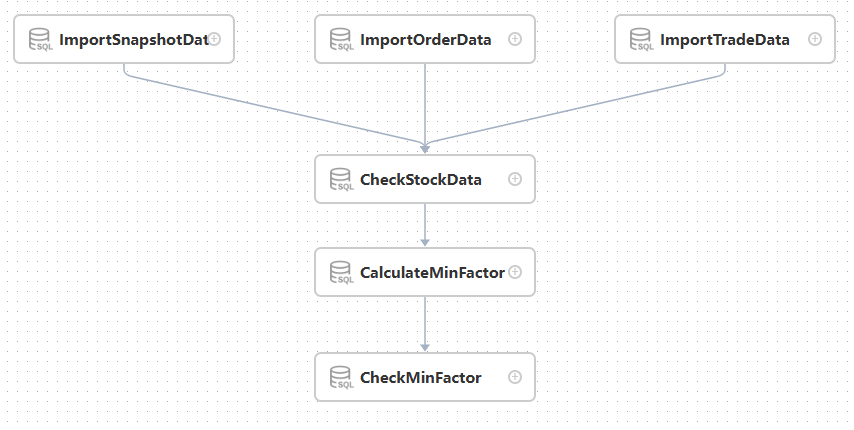
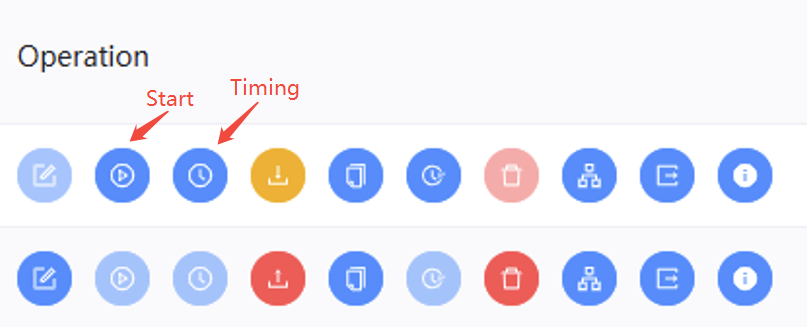
After execution, the green workflow instance demonstrates that the workflow execute successfully, while the black reveals that there are failed tasks in the workflow, where you can click to check.
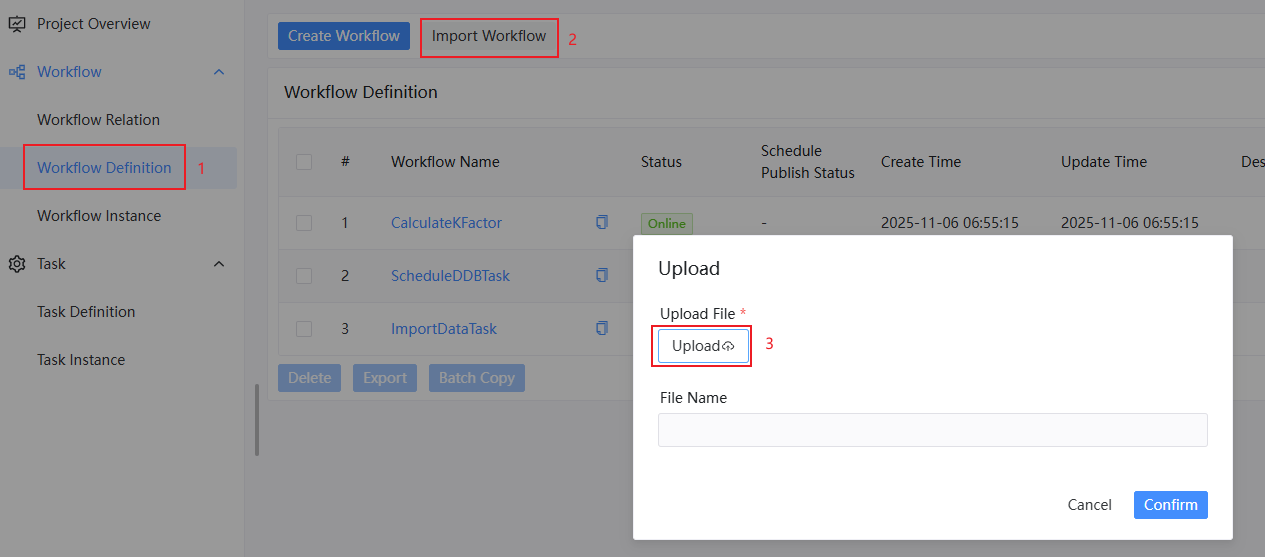
In DolphinScheduler, you can import and output workflows. The daily tasks and batch tasks introduced above can be imported within the json file in the appendix.
- Schedule DolphinDB ETL workflows
After importing the workflow, you can click the Start button to execute the workflows.
2.5. Get the Results of Scheduling DolphinDB Tasks
2.5.1. Check the Status of DolphinDB Tasks
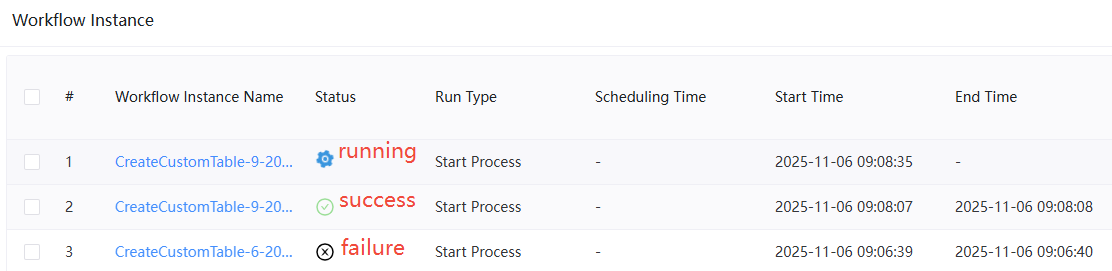
After execution, check the status of DolphinDB tasks on DolphinScheduler:
- The workflow page shows the status of all workflow instances. In the
Status column, the gear icon indicates the workflow is running. A green
checkmark signifies the workflow task completed successfully, while a
black cross indicates the workflow task failed.
- Click the workflow instance name to enter the workflow detail
page:
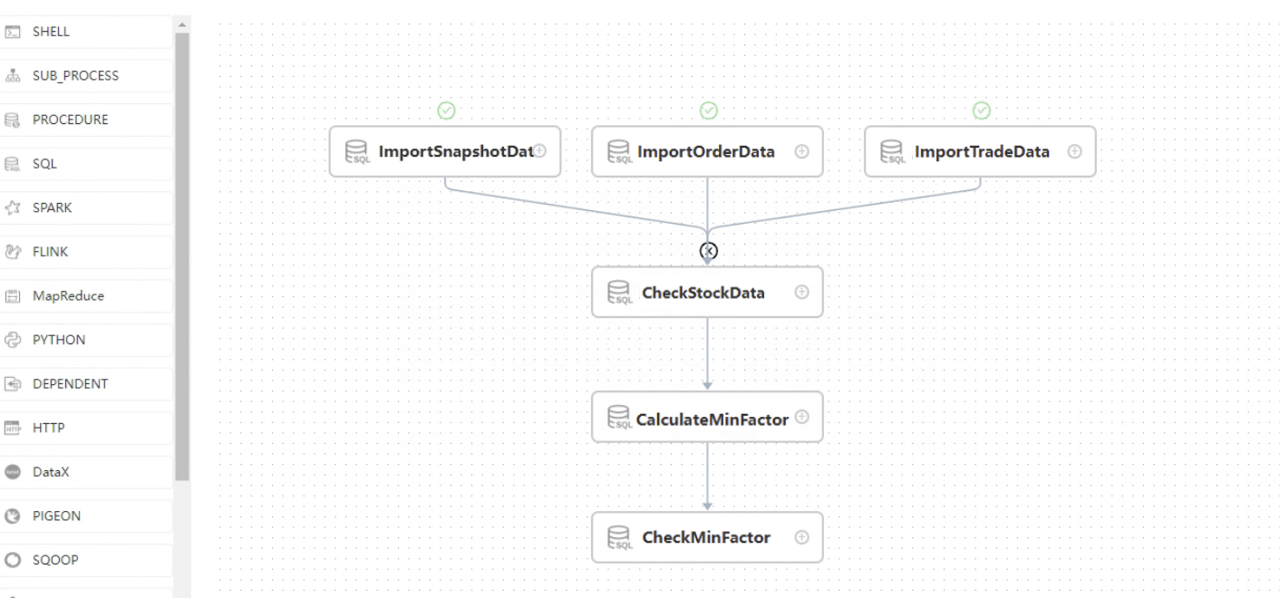
- As the above picture shows, the stock order, snapshot, and the trading data have been successfully imported. However, data checking has failed, causing the entire workflow task to fail. You can right-click on the CheckStockData node, and then click View log to check the specific error message for that task node.
2.5.2. Get the Information in the Process of Execution
During task execution, the DolphinScheduler logs cannot display the
information like the print function in DolphinDB, but you
always need to save execution information to check the status.
This section introduces the features of query and non-query types of DolphinDB SQL task nodes, and explains how to display the execution information in logs of DolphinScheduler task nodes.
How to Get Execution Information
Using the stock order data import task as an example, this section introduces how to set runtime log information at different stages of execution in DolphinDB scripts, and how to display the complete runtime information in the logs on DolphinScheduler after the task is completed.
- In the
stockData::stockDataLoadmodule's function, introduce a parameter, an in-memory table infoTb, to record the runtime information that needs to be logged during the task execution.// Define the loadEntrust function in the stockData::stockDataLoad module as follows: module stockData::stockDataLoad use stockData::stockDataProcess def loadEntrust(userName, userPassword, startDate, endDate, dbName, tbName, filePath, loadType,mutable infoTb) { for(loadDate in startDate..endDate) { // Delete the existing data dateString = temporalFormat(loadDate,"yyyyMMdd") dataCount = exec count(*) from loadTable(dbName, tbName) where date(tradeTime)=loadDate // Delete any existing data to be processed for the current day in the table if(dataCount != 0){ msg = "Start to delete the entrust data, the delete date is: " + dateString print(msg) // Insert the runtime information into the table infoTb.tableInsert(msg) dropPartition(database(dbName), loadDate, tbName) msg = "Successfully deleted the entrust data, the delete date is: " + dateString print(msg) infoTb.tableInsert(msg) } // Import data // Check whether the CSV file exists fileName = filePath + "/" + dateString + "/" + "entrust.csv" if(!exists(fileName)) { throw fileName + " does not exist! Please check the datasource!" } // Batch process market data due to its large quantity schemaTB = schemaEntrust() tmpData1 = loadText(filename=fileName, schema=schemaTB) tmpData1,n1,n2 = processEntrust(loadDate,tmpData1) pt = loadTable(dbName,tbName) msg = "the data size in csv file is :" + n2 + ", the duplicated count is " + (n1 - n2) print(msg) infoTb.tableInsert(msg) for(i in 0..23) { startTime = 08:00:00.000 + 1200 * 1000 * i tmpData2 = select * from tmpData1 where time(TradeTime)>=startTime and time(TradeTime)<(startTime+ 1200 * 1000) if(size(tmpData2) < 1) { continue } // Append data into database pt.append!(tmpData2) } msg = "successfully loaded!" print(msg) infoTb.tableInsert(msg) } } - Define a table in each function view within DolphinDB scripts. During
the execution, when a piece of information is generated, it is written
to this table. After the execution, the table is
returned:
use stockData::stockDataLoad def loadEntrustFV(userName="admin" , userPassword="123456", startDate = 2023.02.01, endDate = 2023.02.01, dbName = "dfs://stockData", tbName = "entrust", filePath = "/hdd/hdd8/ymchen", loadType = "daily") { // Define the runtime information table infoTb = table(1:0,["info"] ,[STRING]) if(loadType == "daily") { sDate = today() eDate = today() // Pass the runtime information table as a parameter to the data import function, and write the information that needs to be output each time into this table loadEntrust(userName, userPassword, sDate, eDate, dbName, tbName, filePath, loadType,infoTb) } else if(loadType == "batch") { loadEntrust(userName, userPassword, date(startDate), date(endDate), dbName, tbName, filePath, loadType,infoTb) } // Return the runtime information table return infoTb } - Add SQL query nodes in DolphinScheduler workflows for
retrieving runtime information. The logics are as follows:
- Execute the stock order data import function view to obtain the runtime information table object.
- Use SQL query node to convert the runtime information table object into a more user-friendly way for display in the task node's log interface.
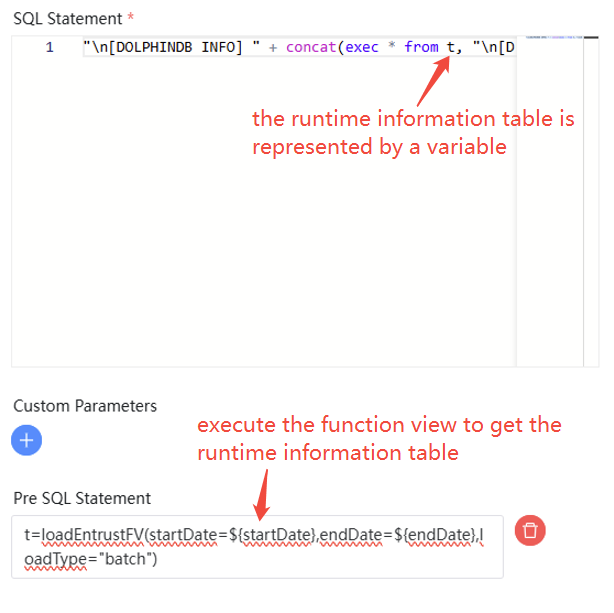
To achieve the above steps, two methods can be used:
- In the SQL query node, input the following code to combine the
two steps mentioned above into a single line of
code:
"\n[DOLPHINDB INFO] " + concat(exec * from loadEntrustFV(startDate=${startDate},endDate=${endDate},loadType="batch"),"\n[DOLPHINDB INFO] ");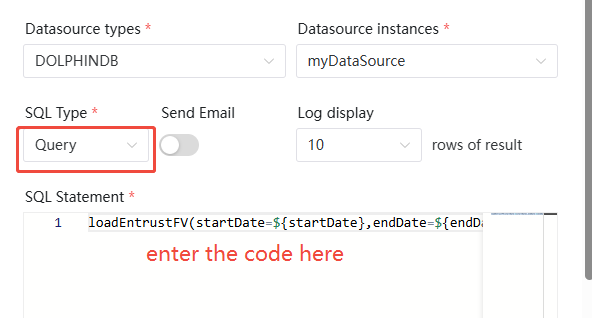
- In the pre-task of SQL query type, the runtime information table
is obtained and converted into the target format through the SQL
statement.
- The whole workflow is as follows:

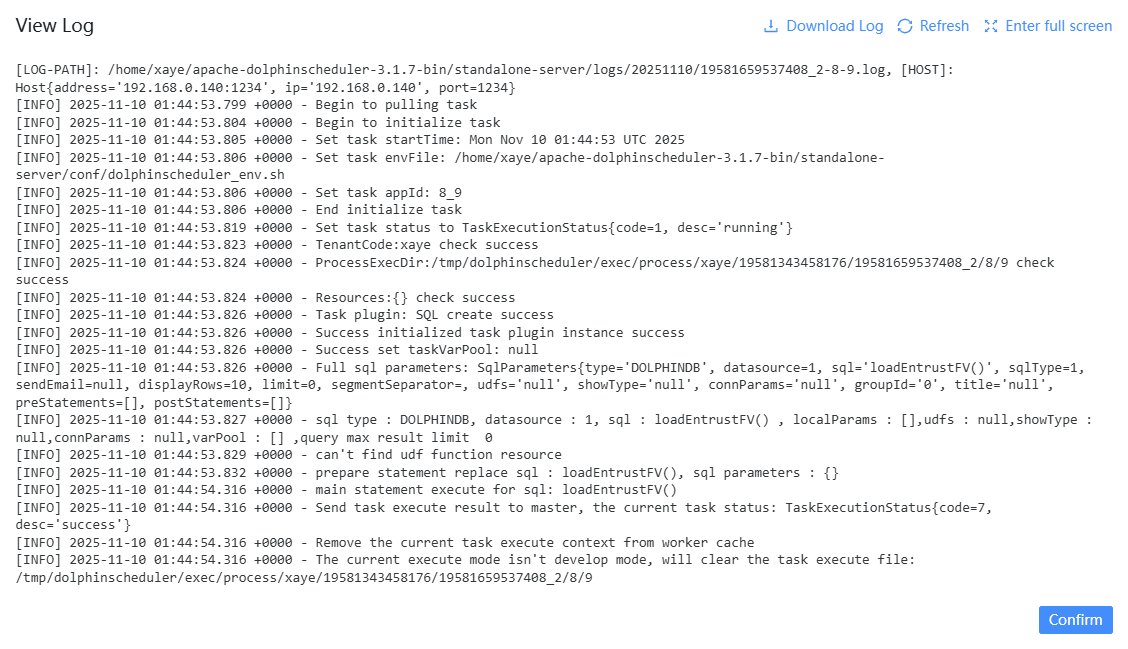
- Right-click the corresponding task node, and click the View
log button, you can check the runtime messages of the
corresponding DolphinDB task node.
2.6. Considerations for DolphinDB Scripts
- When calling a plugin function within a module, the plugin must first be imported on multiple data nodes and the controller.
- The parameters uploaded to DolphinScheduler are stored as strings.
Therefore, in DolphinDB, they need to be further converted to the
expected data types, for
example:
// The statement executed on DolphinScheduler: loadSnapshotFV(startDate=${startDate},endDate=${endDate},loadType="batch"); // Since the passed startDate is of STRING type, it needs to be converted to DATE type when defining the function on DolphinDB use stockData::stockDataLoad def loadEntrustFV(userName="admin" , userPassword="123456", startDate = 2023.02.01, endDate = 2023.02.01, dbName = "dfs://stockData", tbName = "entrust", filePath = "/hdd/hdd/ymchen", loadType = "daily") { if(loadType == "batch") { // Convert startDate to Date type using date(startDate) loadEntrust(userName, userPassword, date(startDate), date(endDate), dbName, tbName, filePath, loadType) } } // Create a new function view addFunctionView(loadEntrustFV) - When modifying the module files, update function views following these
steps:
- Use the
clearCachedModulesfunction or reconnect session to clear cached modules. - Use the
dropFunctionViewfunction to delete a specified function view. - Use the
usestatement to reload the modified module. - Use the
addFunctionViewfunction to add new function views.
- Use the
3. Comparison: DolphinScheduler vs Airflow
Airflow is also a high-performance task scheduler, whose integration with DolphinDB has been introduced in the tutorial Best Practices for Integrating Python Airflow With DolphinDB. The following table compares DolphinScheduler and Airflow.
| Features | Airflow | DolphinScheduler |
|---|---|---|
| Scheduler | Custom implementation | Quartz task scheduling library |
| Job type | Python, Bash, HTTP, MySQL, etc. Supports custom Operator extensions | Supports traditional Shell tasks and big data platform task scheduling: MR, Spark, SQL, Python, etc. |
| Executor trigger | Restful | Restful |
| Workflow | DAG → tasks | project → flows → tasks |
| Deployment & maintenance | Complex, including WebServer, Scheduler, Worker | Simple |
| Single point of failure | Scheduler has a single point of failure risk | Decentralized with multiple Masters and Workers |
| Additional requirements for high availablity | Requires Celery, Dask, Mesos + Load Balancer + DB | No additional setup required (natively supported) |
| Over handling | Task overload may crash the server | Task queue mechanism, the number of tasks a single machine can schedule is flexible, when tasks are too many, they will be queued without crashing the machine |
| DAG monitoring interface | Cannot easily distinguish task types | Task status, type, retry count, running machine, visualized variables, and other key information are clear |
| Visual workflow definition | No. DAG is drawn via Python code, inconvenient, high entry barrier for non-technical users | Yes. All workflow definitions are visual. Tasks can be dragged to create a DAG, and data sources/resources can be configured. It also provides API operations for third-party systems |
| Quick deployment | Cluster deployment is complex | One-click deployment |
| Pause & recover | No. Workflows must be terminated and restarted | Supports pause and resume operations, supports stopping tasks |
| Cluster extension | Yes, but only supports horizontal scaling of complex Executors | Yes, with distributed scheduling. Overall scheduling capability scales linearly with cluster size. Master and Worker support dynamic joining and leaving |
| Programming language | Python | Java |
4. FAQs
4.1. DolphinScheduler status shows running, but the login page of web interface can not be accessed
Check the logs for the corresponding date in the
standalone-server/logs/ directory for details.
4.2. DolphinScheduler set to start automatically, but fails to start after server restart
In standalone mode, DolphinScheduler requires you to stop the service manually
before restarting the server by running bash
./bin/dolphinscheduler-daemon.sh stop standalone-server. If it
fails to start, use the command ps aux | grep dolphinscheduler
to find all DolphinScheduler processes, then terminate them with kill
-15 processID. After that, run the start script bash
./bin/dolphinscheduler-daemon.sh start standalone-server in the
scheduler deployment directory.
5. Appendix
- ETL scripts: ETLCase.zip
- Example data: 20230201.zip