Load Balancing With HAProxy
This tutorial presents the best practices for using HAProxy in DolphinDB and offers a solution for high-availability clusters in handling high concurrency and large traffic in production environments.
Overview
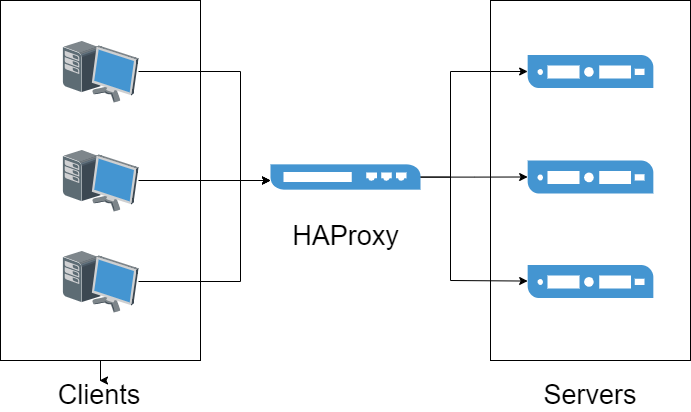
HAProxy is an open-source software developed in C language, offering high availability, load balancing, and proxying for TCP and HTTP-based applications.
This tutorial uses HAProxy version 2.6 and we recommend deploying a stable version for load rebalancing.
Environment Setup
Hardware Requirements:
| Hardware Resource | Configuration |
|---|---|
| Host | HostName |
| IP | xxx.xxx.xxx.122 |
| Operating System | Linux (kernel version 3.10 or higher) |
| Memory | 64 GB |
| CPU | x86_64 (12 CPU processors) |
Software Requirements:
| Software Resource | Version |
|---|---|
| DolphinDB Server | 2.00.8 |
| HAProxy | 2.6.2 |
| Docker | 3.0 or higher |
For more instructions on the installation, see HAProxy documentation.
Installation, Deployment and Application
Before deploying HAProxy, it is recommended to set up a high-availability cluster with multiple data nodes. See High-availability Cluster Deployment.
Installation
Host Environment
Before installing HAProxy, make sure you have installed the epel-release, gcc, and systemd-devel dependencies. Execute the following command to install:
yum -y install epel-release gcc systemd-develDownload and extract the package of the HAProxy 2.6.2 source code:
wget https://www.haproxy.org/download/2.6/src/haproxy-2.6.2.tar.gz && tar zxf haproxy-2.6.2.tar.gzCompile the source code. Replace /path/to/haproxy and /path/to/haproxy/bin with the actual installation path.
cd haproxy-2.6.2
make clean
make -j 8 TARGET=linux-glibc USE_THREAD=1
make PREFIX=${/app/haproxy} SBINDIR=${/app/haproxy/bin} install  # Replace `${/app/haproxy}` and `${/app/haproxy/bin}` with your custom directories.
Modify the system profile to include HAProxy in the system path:
echo 'export PATH=/app/haproxy/bin:$PATH' >> /etc/profile
. /etc/profile
Verify that HAProxy is installed successfully:
which haproxyDocker Environment
To use HAProxy in a Docker environment, pull the HAProxy Docker image (we use the haproxytech/haproxy-alpine:2.6.2 version):
docker pull haproxy:2.6.2-alpineUser and Group Configuration
Before starting HAProxy, ensure that the user and group are properly configured in the configuration file. For example, to specify haproxy as both the user and group, use the following commands:
sudo groupadd haproxy
sudo useradd -g haproxy haproxy
Cluster Monitoring Configuration
HTTP Mode
Create the haproxy.cfg file on the host and set the following configurations:
global                           # Define global configuration
    log         127.0.0.1 local2 # Define the global syslog server, with a maximum of two servers.
    maxconn     4000
    user haproxy
    group haproxy

defaults
    mode                    http               # Set the working mode to HTTP
    log                     global             # Inherit log settings from the global configuration
    option                  httplog            # Set the log category to httplog
    option                  dontlognull        # Do not log empty connections
    option http-server-close
    option forwardfor       except 127.0.0.0/8 # Enable IP forwarding
    option                  redispatch         # Redirect requests to other healthy servers if a server is unavailable.
    retries                 3                  # Maximum number of connection attempts to upstream servers (set to 3)
    timeout http-request    10s
    timeout queue           1m                 # Maximum queuing time for requests
    timeout connect         10s                # Maximum time to establish a connection between HAProxy and the backend server
    timeout client          1h                 # Maximum idle connection time with the client
    timeout server          1h                 # Maximum idle connection time with the backend server
    timeout http-keep-alive 10s                # Keep-alive session duration with the client (set to 10s)
    timeout check           10s
    maxconn                 3000               # Maximum number of connections allowed between clients and servers (set to 3000)

frontend    ddb_fronted
    bind        *:8080 # Port used by the frontend to receive requests
    mode        http
    log         global
    default_backend ddb_backend

backend ddb_backend
    balance roundrobin # Use the dynamic weighted round-robin algorithm, which supports runtime weight adjustment and slow start mechanism. This is the fairest and most balanced load-balancing algorithm.
    # Check the server port every 5 seconds. If 2 consecutive checks pass, the server is considered available; if 3 consecutive checks fail, the server is marked as unavailable.
    server node1 xxx.xxx.xxx.1:9302 check inter 5s rise 2 fall 3
    server node2 xxx.xxx.xxx.2:9302 check inter 5s rise 2 fall 3
    server node3 xxx.xxx.xxx.3:9302 check inter 5s rise 2 fall 3
    server node4 xxx.xxx.xxx.4:9302 check inter 5s rise 2 fall 3

listen stats
    mode    http
    bind    0.0.0.0:1080    # Port for accessing the monitoring page
    stats   enable
    stats   hide-version
    stats uri /haproxyamdin # URI for the monitoring page
    stats realm Haproxy     # Display message for the monitoring page
    stats auth admin:admin  # Username and password for accessing the monitoring page (both set to "admin")
    stats admin if TRUE
TCP Mode
global                           # Define global configuration
    log         127.0.0.1 local2 # Define the global syslog server, with a maximum of two servers.
    maxconn     4000
    user haproxy
    group haproxy

defaults
    mode                    tcp               # Set the working mode to TCP
    log                     global            # Inherit log settings from the global configuration
    option                  tcplog            # Set the log category to tcplog
    option                  dontlognull       # Do not log empty connections
    option http-server-close
    option                  redispatch        # Redirect requests to other healthy servers if a server is unavailable.
    retries                 3                 # Maximum number of connection attempts to upstream servers (set to 3)
    timeout http-request    10s
    timeout queue           1m                # Maximum queuing time for requests
    timeout connect         10s               # Maximum time to establish a connection between HAProxy and the backend server
    timeout client          1h                # Maximum idle connection time with the client
    timeout server          1h                # Maximum idle connection time with the backend server
    timeout http-keep-alive 10s               # Keep-alive session duration with the client (set to 10s)
    timeout check           10s
    maxconn                 3000              # Maximum number of connections allowed between clients and servers (set to 3000)

frontend    ddb_fronted
    bind        *:8080 # Port used by the frontend to receive requests
    mode        tcp
    log         global
    default_backend ddb_backend

backend ddb_backend
    balance roundrobin # Use the dynamic weighted round-robin algorithm, which supports runtime weight adjustment and a slow-start mechanism. This is the fairest and most balanced load-balancing algorithm.
    # Check the server port every 5 seconds. If 2 consecutive checks pass, the server is considered available; if 3 consecutive checks fail, the server is marked as unavailable.
    server node1 10.0.0.80:8802 check inter 5s rise 2 fall 3 send-proxy
    server node2 10.0.0.81:8802 check inter 5s rise 2 fall 3 send-proxy
    server node3 10.0.0.82:8802 check inter 5s rise 2 fall 3 send-proxy

listen stats
    mode    http
    bind    0.0.0.0:1080    # Port for accessing the monitoring page
    stats   enable
    stats   hide-version
    stats uri /haproxyamdin # URI for the monitoring page
    stats realm Haproxy     # Display message for the monitoring page
    stats auth admin:admin  # Username and password for accessing the monitoring page (both set to "admin")
stats admin if TRUENote:
The IP and port specified for the backend servers can be customized according to your scenario. For further examples, refer to HAProxy Configuration Manual.
In TCP mode, the
listen stats modemust be configured as http.The configuration
check inter 5s rise 2 fall 3defines the frequency of node health checks and failover. Specifically:inter 5smeans that the node status is checked every 5 seconds.rise 2indicates that after two consecutive successful checks, the node will be marked as available.fall 3means that after three consecutive failed checks, the node will be marked as unavailable, triggering a failover.
If you want to shorten the detection and failover time for failed nodes, you can achieve this by reducing the interval between individual checks and the number of checks required for determination. For example, modifying the configuration to
check inter 2s rise 2 fall 2will reduce the node failure detection time from approximately 15 seconds to about 4 seconds.
Service Startup
To start HAProxy in a host environment, execute the following command. The -f option specifies the path to the configuration file, which defaults to /etc/haproxy/haproxy.cfg. In this case, the configuration file is located at /haproxy/haproxy.cfg:
haproxy -f /haproxy/haproxy.cfgTo create an HAProxy container in a Docker environment, execute the following command. Ensure that the monitoring and frontend ports are mapped to the host, and the pre-configured haproxy.cfg file on the host is mapped to the container:
docker run -itd --name ddb_haproxy -p 8080:8080 -p 1080:1080 -v /haproxy/haproxy.cfg:/usr/local/etc/haproxy/haproxy.cfg --privileged=true haproxy:2.6.2-alpineOnce HAProxy is successfully started, users can access the DolphinDB cluster service through the frontend port using client tools such as VS Code extension and Web.
Note: When a DolphinDB client tool connects to the listening proxy port, HAProxy will allocate connections to one of the nodes deployed in the back end for load balancing according to corresponding algorithm rules.
High Availability and Keepalived
Keepalived is a lightweight high-availability solution that dynamically manages Virtual IP Addresses (VIPs) using the VRRP protocol, enabling automatic failover between primary and backup nodes.
In this deployment, when the primary HAProxy node fails, Keepalived detects the service anomaly and automatically switches the VIP to the backup node, ensuring the continuity and stability of HAProxy services.
Keepalived Deployment

(1) Install Dependencies
Run the following command to install the necessary dependencies:
yum -y install gcc openssl-devel pcre2-devel systemd-devel openssl-devel(2) Install Keepalived
Download Keepalived 2.3.0 from the official site, then compile and install it:
tar zxf keepalived-2.3.0.tar.gz
cd keepalived-2.3.0

./configure
make
make install
(3) Master/Backup Node Configuration
vim /etc/keepalived/keepalived.confConfigure the primary (MASTER) node and backup (BACKUP) node as follows:
global_defs {
  router_id ha_1                   # On the backup node, change to ha_2
  vrrp_iptables
  vrrp_garp_interval 0
  vrrp_gna_interval 0
}

vrrp_script chk_haproxy {
   script "/usr/sbin/pidof haproxy"    # Checks if the haproxy process is running
   interval 2                      # Checks every 2 seconds
   weight -30                      # Reduces priority by 30 if check fails
}

vrrp_instance VI_1 {
   state MASTER                    # Change to BACKUP on the backup node
   interface eth1                  # Replace with the actual network interface
   virtual_router_id 51
   priority 100                    # Set to 80 on the backup node
   advert_int 1
   authentication {
       auth_type PASS
       auth_pass 1111
   }
   virtual_ipaddress {
       10.0.0.100                # Replace with the actual VIP
   }
   track_script {
       chk_haproxy
   }
}
Set
state MASTERfor the primary node andstate BACKUPfor the backup node.Set
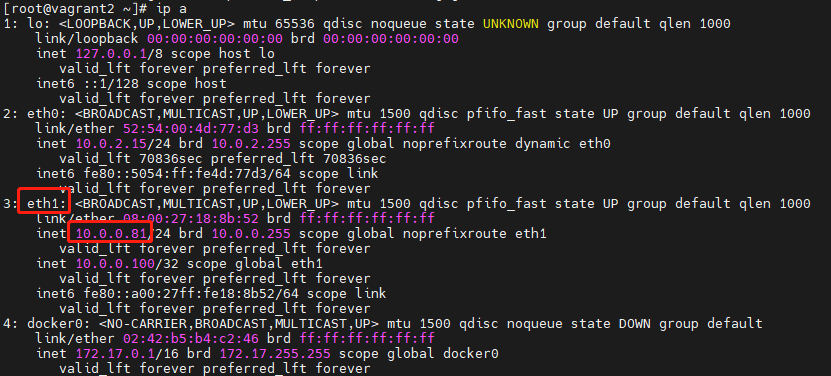
interfaceto match the network card used by HAProxy.The VIP must be within the same subnet as the primary and backup nodes. For example, check the current node IP with
ip a. In this example, HAProxy is accessible via 10.0.0.81:8080. Set the primary node to 10.0.0.80, backup node to 10.0.0.81, VIP to 10.0.0.100.
(4) Start Keepalived
Execute the following commands to start Keepalived and enable it at system startup:
systemctl restart keepalived.service  # Restart Keepalived
systemctl enable keepalived.service  # Enable auto-start on system boot
systemctl status keepalived.service   # Check the service status
After Keepalived starts, the primary node binds to the VIP, allowing users to access the HAProxy service via the VIP (e.g., 10.0.0.100:8080). If the primary node's HAProxy service becomes unavailable, Keepalived promotes the backup node to primary and rebinds the VIP, ensuring continuous availability. To verify the current primary node, check its status or inspect whether the network interface is bound to the VIP using:
ip addr show eth1
Operation and Maintenance
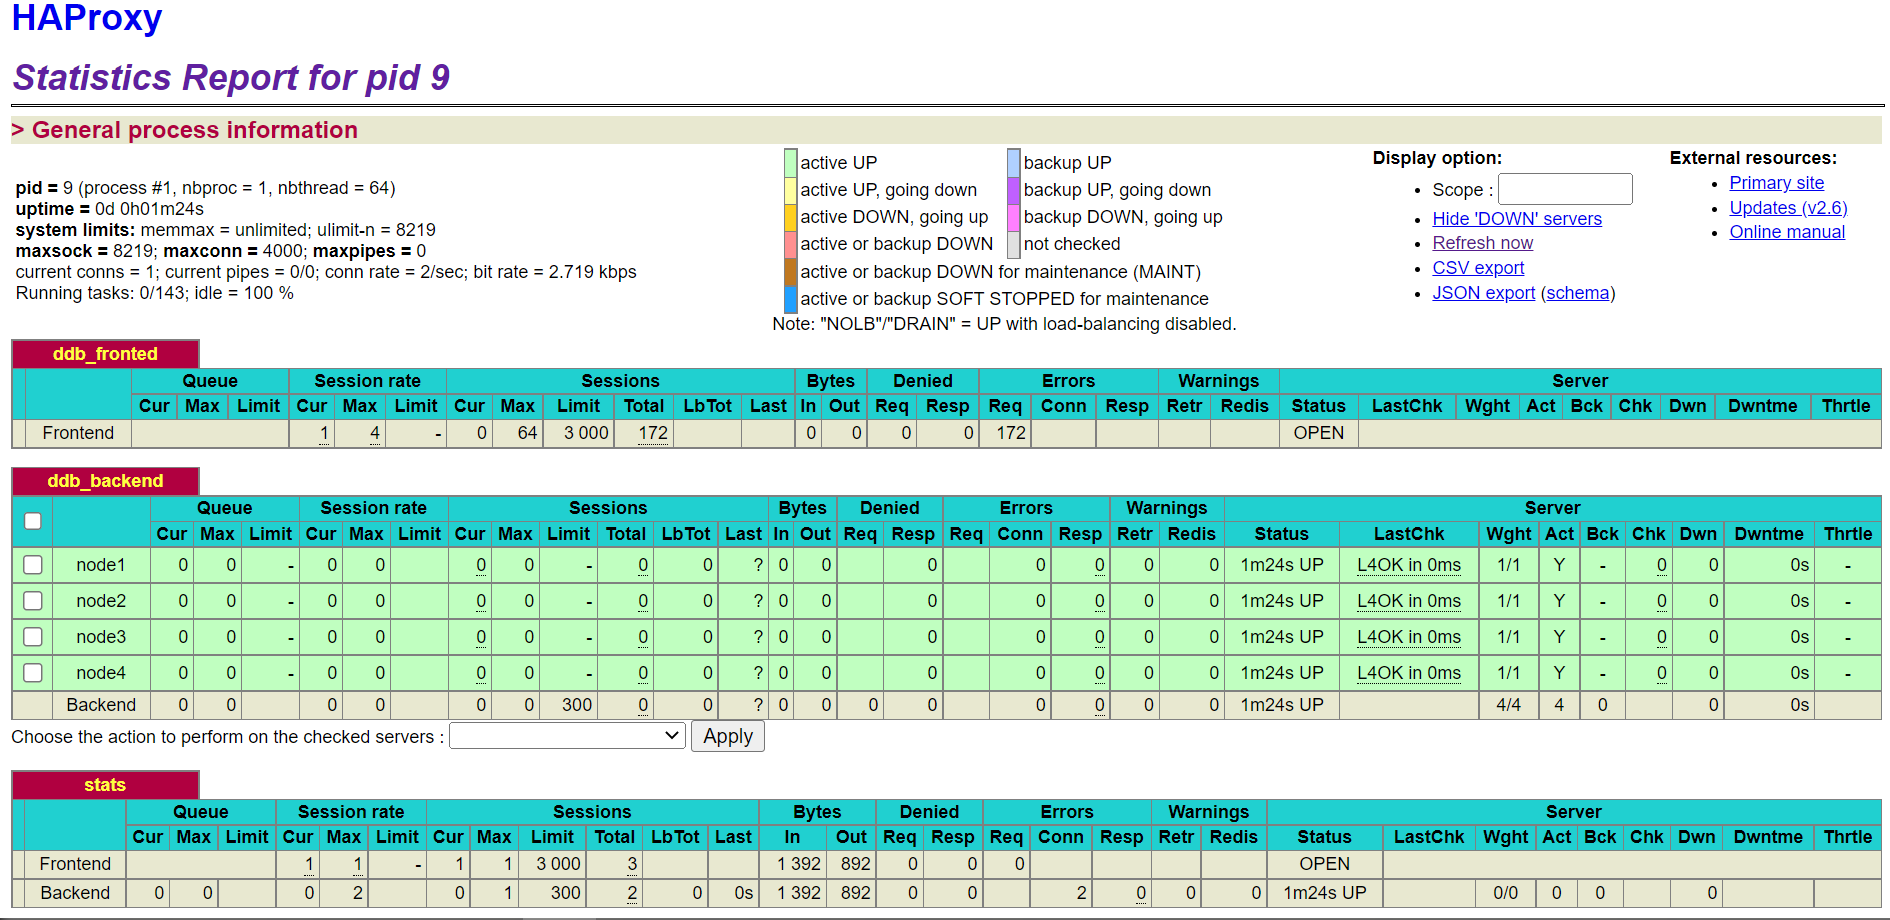
HAProxy Stats Page
To view the HAProxy Stats page, enter the host IP, listening port, and configured URI (e.g. xxx.xxx.xxx.122:1080/haproxyamdin) in a browser on any machine that can access the HAProxy host.
Restart or Terminate HAProxy
You need to terminate or restart HAProxy for the configuration changes to take effect.
Run the following command to find the PID of a running HAProxy process on host:
ps -ef | grep haproxyThen run the kill command to terminate the process:
kill -9 ${haproxy_pid}To restart HAProxy, you can invoke command haproxy -f again.
In Docker environment, you can use the following command to restart the service:
docker restart ddb_haproxyTo terminate and delete the container, you can run the following command:
docker stop ddb_haproxy && docker rm ddb_haproxy