Multi-Container Deployment With Docker Compose
Docker Compose is a tool for defining and running multi-container Docker applications. This tutorial introduces how to use Docker Compose to deploy DolphinDB clusters on multiple containers.
Prerequisites and Environment Setup
- Install Docker
Install Docker on Linux/Mac OS/Windows.
- Install Docker Compose
We recommend you to download the compiled binary of Docker Compose from the official release. See Install Docker Compose CLI for installation instructions.
- Host Information
- single server:
| Host | IP | Docker Service | Mount Point |
|---|---|---|---|
| cnserver9 | xx.xx.xx.122 | dolphindb | /ddbdocker |
- multiple servers:
| Host | IP | Docker Service | Mount Point |
|---|---|---|---|
| host1 | xx.xx.xx.81 | dolphindb controller1&dolphindb agent1 | /host1 |
| host2 | xx.xx.xx.82 | dolphindb controller2&dolphindb agent2 | /host2 |
| host3 | xx.xx.xx.83 | dolphindb controller3&dolphindb agent3 | /host3 |
Cluster Architecture
A DolphinDB cluster consists of 4 types of nodes: controller, agent,data node, and compute node.
Note:
- Any data node or compute node can be used as a client for data access, while a controller is only used for cluster management and coordination.
- The IP address of a node must be an intranet IP. If an external network address is used, the network communication performance among nodes may be unstable. Inter-container communication is usually enabled by connecting the containers to a bridge network and assigning an IP address to each container.
Quick Starts (Single-Server Deployment)
The following example shows how to deploy a DolphinDB cluster using image dolphindb/dolphindb:v2.00.5 with Docker Compose. The DolphinDB image is the community edition of v2.00.5. As the community license limits the number of data nodes in a cluster, the following example deploys a cluster with 2 containers (one is a controller and the other contains an agent and a data node).
- Log in the server and execute the following commands:
git clone https://github.com/dolphindb/dolphindb-k8s
cd dolphindb_k8s/docker-compose/ddb_cluster_quick && docker-compose up -d
Expected output:
[+] Running 2/2
 ⠿ ddb_controller Pulled                                                                                                 4.5s
 ⠿ ddb_agent1 Pulled                                                                                                     4.4s
[+] Running 3/3
 ⠿ Network dev_ddb           Created                                                                                     0.1s
 ⠿ Container ddb_controller  Started                                                                                     0.5s
⠿ Container ddb_agent1 Started 0.8s- Enter "IP:port" (where port is 8900) in your browser and the page shows:

Production Environment (Single-Server High-Availability Deployment)
Prerequisites
This chapter will deploy a high-availability cluster with multiple controllers and data nodes on multiple containers of a single server using image dolphindb/dolphindb:v2.00.5. You can download a high-availability cluster with three controllers and three data nodes using Docker Compose. Note that an enterprise license is required to deploy a high-availability cluster.
Procedures
Log in the server and execute the following commands:
git clone https://github.com/dolphindb/dolphindb-k8sThen check the tree-structured directory:
cd dolphindb-k8s/docker-compose/ddb_high_cluster && tree ./Expected output:
./
├── cfg
│   ├── agent1.cfg
│   ├── agent2.cfg
│   ├── agent3.cfg
│   ├── cluster.cfg
│   ├── cluster.nodes
│   ├── controller1.cfg
│   ├── controller2.cfg
│   └── controller3.cfg
├── cluster
│   ├── agent
│   │   ├── data
│   │   └── log
│   └── controller
│       ├── data
│       └── log
├── docker-compose.yml
└── dolphindb.lic

8 directories, 10 files
The files/folders are explained below:
| File/Folder | Description | Directory of Host | Directory of Container |
|---|---|---|---|
| docker-compose.yml | defining services, networks, and volumes for a Docker application | None | None |
| dolphindb.lic | license file of DolphinDB | ./dolphindb.lic | /data/ddb/server/dolphindb.lic |
| cfg | storing the configuration files of nodes | ./cfg/agent1.cfg; ./cfg/agent2.cfg; ./cfg/agent3.cfg; ./cfg/cluster.cfg; ./cfg/cluster.nodes; ./cfg/controller1.cfg; ./cfg/controller2.cfg; ./cfg/controller3.cfg | /data/ddb/server/clusterDemo/config/agent1.cfg; /data/ddb/server/clusterDemo/config/agent2.cfg; /data/ddb/server/clusterDemo/config/agent3.cfg; /data/ddb/server/clusterDemo/config/cluster.cfg; /data/ddb/server/clusterDemo/config/cluster.nodes; /data/ddb/server/clusterDemo/config/controller1.cfg; /data/ddb/server/clusterDemo/config/controller2.cfg; /data/ddb/server/clusterDemo/config/controller3.cfg; |
| cluster | storing DolphinDB data and logs | ./cluster/controller/data; ./cluster/controller/log; ./cluster/agent/data; ./cluster/agent/log | /data/ddb/server/clusterDemo/data; /data/ddb/server/clusterDemo/log |
Start Docker Compose service:
docker-compose up -dExpected output:
[+] Running 7/7
 ⠿ Network dev_ddb            Created                                                                                    0.2s
 ⠿ Container ddb_controller3  Started                                                                                    1.0s
 ⠿ Container ddb_controller1  Started                                                                                    1.0s
 ⠿ Container ddb_controller2  Started                                                                                    0.9s
 ⠿ Container ddb_agent3       Started                                                                                    1.9s
 ⠿ Container ddb_agent1       Started                                                                                    1.9s
 ⠿ Container ddb_agent2       Started                                                                                    1.8s
Enter "IP:port" (where port is 8901) in your browser and the page shows:

Click the "guest" → "Log in" button in the upper right corner, and enter username "admin" and password "123456" to start the container services. See DolphinDB High-availability Cluster Deployment and Docker Documentationfor detailed instructions.
Note: For the single-node high-availability cluster deployed in this chapter, IP addresses within the virtual network domain are assigned to nodes. The cluster cannot be scaled out to a multi-node high-availability cluster.
Production Environment (Multi-Server High-Availability Deployment)
Prerequisites
This chapter will deploy a high-availability cluster with multiple controllers and data nodes on multiple containers of multiple servers using image dolphindb/dolphindb:v2.00.5. You can download a high-availability cluster with three controllers and three data nodes with Docker Compose. Note that an enterprise license is required to deploy a high-availability cluster.
Procedures
Copy DolphinDB image by executing the following commands on each node:
- host1:
git clone https://github.com/dolphindb/dolphindb-k8s  \
&& cd dolphindb_k8s/docker-compose/ddb_high_cluster_multi_machine/host1- host2:
git clone https://github.com/dolphindb/dolphindb-k8s  \
&& cd dolphindb_k8s/docker-compose/ddb_high_cluster_multi_machine/host2- host3:
git clone https://github.com/dolphindb/dolphindb-k8s  \
&& cd dolphindb_k8s/docker-compose/ddb_high_cluster_multi_machine/host3
Then check the tree-structured directory:
tree ./Expected output:
- host1:
./
├── cfg
│   ├── agent1.cfg
│   ├── cluster.cfg
│   ├── cluster.nodes
│   └── controller1.cfg
├── cluster
│   ├── agent
│   │   ├── data
│   │   └── log
│   └── controller
│       ├── data
│       └── log
├── docker-compose.yml
└── dolphindb.lic

8 directories, 6 files- host2:
./
├── cfg
│   ├── agent2.cfg
│   ├── cluster.cfg
│   ├── cluster.nodes
│   └── controller2.cfg
├── cluster
│   ├── agent
│   │   ├── data
│   │   └── log
│   └── controller
│       ├── data
│       └── log
├── docker-compose.yml
└── dolphindb.lic

8 directories, 6 files- host3:
./
├── cfg
│   ├── agent3.cfg
│   ├── cluster.cfg
│   ├── cluster.nodes
│   └── controller3.cfg
├── cluster
│   ├── agent
│   │   ├── data
│   │   └── log
│   └── controller
│       ├── data
│       └── log
├── docker-compose.yml
└── dolphindb.lic

8 directories, 6 files
The files/folders are explained below:
| File/Folder | Description | Directory of Host | Directory of Container |
|---|---|---|---|
| docker-compose.yml | defining services, networks, and volumes for a Docker application | none | none |
| dolphindb.lic | license file of DolphinDB | ./dolphindb.lic | /data/ddb/server/dolphindb.lic |
| cfg | storing the configuration files of nodes | ./cfg/agent1.cfg; ./cfg/agent2.cfg; ./cfg/agent3.cfg; ./cfg/cluster.cfg; ./cfg/cluster.nodes; ./cfg/controller1.cfg; ./cfg/controller2.cfg; ./cfg/controller3.cfg | /data/ddb/server/clusterDemo/config/agent1.cfg; /data/ddb/server/clusterDemo/config/agent2.cfg; /data/ddb/server/clusterDemo/config/agent3.cfg; /data/ddb/server/clusterDemo/config/cluster.cfg; /data/ddb/server/clusterDemo/config/cluster.nodes; /data/ddb/server/clusterDemo/config/controller1.cfg; /data/ddb/server/clusterDemo/config/controller2.cfg; /data/ddb/server/clusterDemo/config/controller3.cfg; |
| cluster | storing DolphinDB data and logs | ./cluster/controller/data; ./cluster/controller/log; ./cluster/agent/data; ./cluster/agent/log | /data/ddb/server/clusterDemo/data; /data/ddb/server/clusterDemo/log |
The node and container information is shown below:
| Container Name (Unique) | Node Type | Host IP | Node Name, Type, Port |
|---|---|---|---|
| ddb_controller1 | controller | xx.xx.xx.81 | controller1,controller,8901 |
| ddb_controller2 | controller | xx.xx.xx.82 | controller2,controller,8902 |
| ddb_controller3 | controller | xx.xx.xx.83 | controller3,controller,8903 |
| ddb_agent1 | agent & data node | xx.xx.xx.81 | agent1,agent,8904 P1-node1,datanode,8905 |
| ddb_agent2 | agent & data node | xx.xx.xx.82 | agent2,agent,8906 P2-node1,datanode,8907 |
| ddb_agent3 | agent & data node | xx.xx.xx.83 | agent3,agent,8908 P3-node1,datanode,8909 |
Note:
- The file mapping process overwrites the containers with the files on the host machine. It's necessary to confirm whether to keep the data, logs and configuration files when creating a container.
- To ensure the communication among host machines and containers, you can modify the host IP. For the configuration of IP addresses for each server, see DolphinDB Multi-Machine Cluster Deployment
Start Docker Compose service by executing the following command on each server (where the docker-compose.yml resides):
docker-compose up -dExpected output:
- host1:
[+] Running 3/3
 ⠿ Network dev_ddb            Created                                                                                0.1s
 ⠿ Container ddb_controller1  Started                                                                                1.7s
⠿ Container ddb_agent1 Started 3.3s- host2:
[+] Running 3/3
 ⠿ Network dev_ddb            Created                                                                                0.1s
 ⠿ Container ddb_controller2  Started                                                                                1.4s
⠿ Container ddb_agent2 Started 3.2s- host3:
[+] Running 3/3
 ⠿ Network dev_ddb            Created                                                                                0.1s
 ⠿ Container ddb_controller3  Started                                                                                1.7s
 ⠿ Container ddb_agent3       Started                                                                                3.4s
Enter "IP:port" (where port is 8901) in your browser and the page shows:
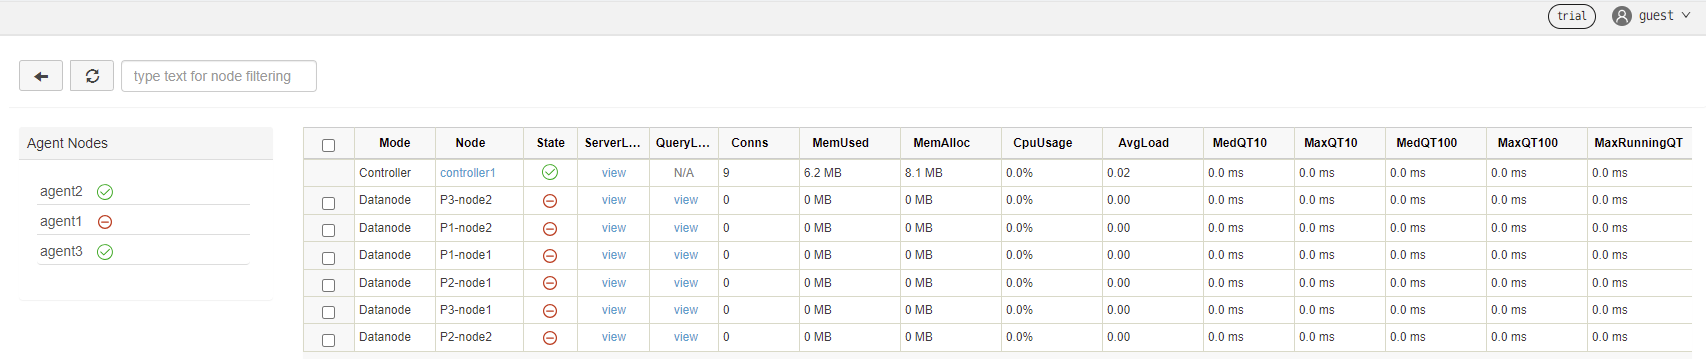
Click the "guest" → "Log in" button in the upper right corner, and enter username "admin" and password "123456" to start the container services. See DolphinDB High-availability Cluster Deployment and Docker Documentationfor detailed instructions.
FAQ
How to upgrade DolphinDB version?
For example, to upgrade the DolphinDB image to version dolphindb/dolphindb:v2.00.6:
To upgrade all containers, go to the .env file under the same directory as docker-compose.yml and modify the environment variables:
IMAGE=dolphindb/dolphindb:v2.00.6Execute the following command and restart the services:
docker-compose down && docker-compose up -dExpected output:
[+] Running 7/7
 ⠿ Container ddb_agent3       Removed                                                                                    1.6s
 ⠿ Container ddb_agent1       Removed                                                                                    1.6s
 ⠿ Container ddb_agent2       Removed                                                                                    1.3s
 ⠿ Container ddb_controller1  Removed                                                                                    2.7s
 ⠿ Container ddb_controller2  Removed                                                                                    2.6s
 ⠿ Container ddb_controller3  Removed                                                                                    2.6s
 ⠿ Network dev_ddb            Removed                                                                                    0.1s
Errors and Solutions
If the following error message is reported:
but no declaration was found in the volumes section.It indicates that the data volume is not declared or that a relative path is not used to map the data volume.
Solution: Configure the data volume in the yaml file and use a relative path for file mapping.